
From Collage Chaos to Mounted Magic: What to Do with 100 Tiny Drawings
You did it. You completed your 100 Day Project. You stayed consistent. You overcame any bumps along the road. You fought the boredom, the overwhelm, the excuses. And now you are thinking… now what? It can feel a bit weird when you finish such a long project. It certainly was for me and my project was pretty simple: 100 tiny drawings over 100 days. But when I finished, I suddenly had a big pile of all of these minis that I wasn’t quite sure what to do with.
Some of the ideas I considered were:
Create a Print of All of them Together

The activity I was looking forward to the most at the end of the project was creating a reel for Instagram where I dumped them all out and put them together into a full image. And this activity did not disappoint, you can check out that reel here. It was so rewarding to see how a little bit of work every day turned into a full composition at the end of the project. I imagined that it could look neat on a wall as a black and white print or even better on something like a tote bag. While I still think that this would be an amazing future project to try (I definitely see myself doing another set of black and white minis), I did not want to spend the time doing it with this project. To really do it the right way would involve scanning each individual drawing and working to remove the background on each so that you would not have any weird colors or shadows on the final project. That is not something I wanted to do at the moment. I also thought that this was just my first time experimenting with this idea of tiny drawings and I knew that I could do better. So this is an idea that I put on the shelf for another day.
Sell or Give Them Away As Is
Each of these little drawings is still unique on their own, but they did not seem like they were in a format that was easy to give away. They felt a bit small, there was no real place to sign them, they were numbered and dated on the back, which was interesting to me, but not necessarily to anybody else, and they just seemed unfinished in a way.
Looking for more 100 Day Project content? Check out these other posts:
Save them for Later
The easiest thing would be to put them in an envelope and put them in my art box. This is where I store most of my finished projects throughout the year. Here they hang out until I am ready for a shop update for my Etsy store, I decide to give them away, I decide they are not good enough to keep, or I decide that I love them enough to put them up on my wall. I definitely knew that I did not want to get rid of them, I was too proud of myself, but I wasn’t sure I really needed them all.
After mulling these ideas over for a while and not really having any idea stand out, I decided to complete some experiments. In these experiments I wanted to see:
If I could create smaller collages that could work as finish pieces.
See what the images would look like if they were mounted as their own individual pieces.
See what it might look like to varnish the collages as opposed to keeping their original matt finish.
See if I could find a way to add some color to the final pieces to make the black and white compositions pop a little bit more.
Creating Watercolor Backgrounds
My first step was to go back to my primary medium of watercolor. One of the unique aspects of watercolor is how the paint reacts with water. It can be a bit unpredictable and I wanted to create a background piece that would show all of the beautiful textures and blooms and movement that you can create with watercolor in a way that would provide a beautiful frame to the individual minis. I decided to create two different watercolor backgrounds using my Gansai Tambi watercolor set. (You can learn more about this palette in Exploring Gansai Tambi: Japanese Watercolors.) I do not use this set very often in my landscape work, but I love how highly pigmented the paints are, resulting in a very rich and vibrant color. These seemed like the perfect paints to create a really beautiful backing paper for my little minis. I worked with a lot of water and worked very quickly with a big paint brush (another thing I do not do very often). When I was happy with the overall look, including textures and blooms, I added some metallic spatters, also from my Gansai Tambi set. For some final interesting textures, I applied small sprinkles of salt in different areas. Salt will absorb the watercolor and water and create interesting star patterns on your paper.


I created two different backgrounds. One was very dark and more moody using the colors of graphite green, blue, and violent with slight tints of gold from the metallic paints. The second was bright and cheerful using the colors of rose madder deep, aureolin, and cadmium orange, again with slight sparkles from using opal copper. Once the watercolor backgrounds were complete it was time to start experimenting.
Enjoying this read? Join my newsletter list and get new content delivered to your inbox every few weeks.
Failed Collages and Varnishing
One final project I wanted to try was creating a collage that put together a handful of the tiny drawings into a larger composition. I would then mount that composition onto one of my watercolor backgrounds. For this, I pulled out my gel gloss medium that I have used previously in creating mounted watercolor ornaments (you can see those here). This gel medium is often used as a collage paste and it has a slightly glossy sheen that I thought could also look interesting as a top coat.
I cut a 5 x 7 card out of my moody background and set about creating a collage. Overall I love the composition and how these tiny paintings look together, but there were lots of things that did not work. Even though the tiny drawings are mostly square, they are not all perfectly square. This meant that they did not all fit perfectly together. This meant that sometimes the individual squares would overlap each other, which created an uneven surface. It was also incredibly hard to work quickly and precisely while collaging. The nature of the paper meant that it would absorb the moisture from the glue, which made it hard to make the composition lay flat. I found that it was challenging to get corners to stay flat. To help with this, I attempted to coat the entire collage with the gel medium to essentially seal all of the smaller pieces in place. Technically this worked and the tiny squares definitely are not going anywhere, but I didn’t like the overall result at all.


I tried with a similar process on some smaller pieces, which were a bit more successful in a technical sense, but I was not happy overall with the outcome. While these were technical failures, I enjoyed the experimentation and it gave me ideas for what I could try next and they are pieces that I still want to keep for my own collection. The 5 x 7 piece is now hanging on my small gallery wall, while the willows will make a nice bookmark. With these failed experiments set aside, I gave myself a break to decide what I wanted to do next.
Pivoting to Elevated Minis
After a few days, I decided that I really liked the mat finish of the watercolor backgrounds and that instead of collages, I wanted to just mount a series of my favorite pieces onto those backgrounds. I set about cutting up a bunch of backgrounds in the sizes of 2 x 2 or 2 x 3 inches to fit the most common size drawings of 1 x 1 and 1 x 2 inches. I decided to use the gel medium to mount each of them centered on the backing paper. Once I got all of my small pieces mounted, I placed them between two sheets of corrugated plastic and set them under a stack of books to finish drying.

Final set of minis.
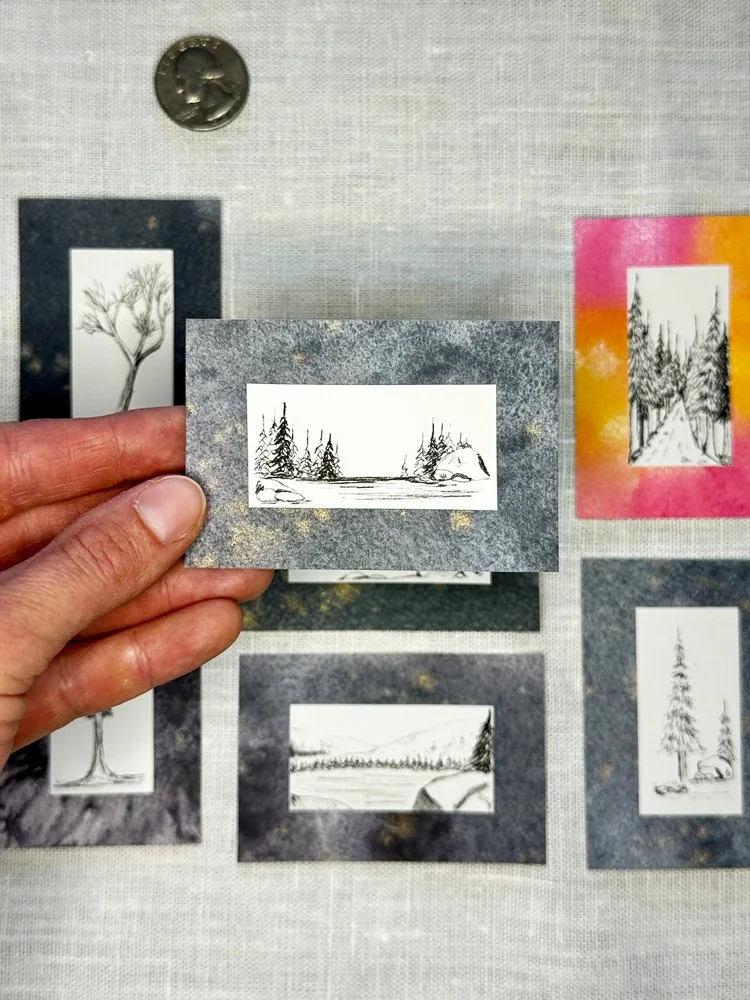
Final mini measures 2 × 3 inches.

Final mini measuring 2 × 2 inches.

Final mini measuring 2 × 2 inches.
Final Thoughts
I am really pleased with the final result of these minis mounted on the textured watercolor backgrounds. I like that the colorful backgrounds are interesting on their own and how they really allow the black and white of the mini to pop against each background. Keeping each mini separate also allows you to appreciate them individually, though I think they could look really interesting as a set together. While it was disappointed to “waste” some of my favorite minis to my experiments, one of the best things about my original 100 Day Project was that I learned there are so many ideas and new drawings just waiting to be created and that I’m sure I will have plenty of more minis to choose from at the year continues. And I never would have arrived on this final version of the minis if I did not complete those experiments. If one of these minis speaks to you, check out my Etsy shop for current available work.
